Friday, August 24, 2012

Free Java training videos.

Guys, If you are really interested to learn any of the below specifications, please visit to "http://javabrains.koushik.org" website. You will find the excellent video tutorials by Koushik.
1. Spring Framework.
2. Struts 2.
3. Hibernate.
4. Maven.
5. JSP's and Servlets.

Please do visit "Java Brains" once.

http://javabrains.koushik.org


Java code to connect with oracle 10g database


Download ojdbc14.jar and add to the project library.


import java.sql.Connection;
import java.sql.DriverManager;
import java.sql.PreparedStatement;
import java.sql.ResultSet;
import java.sql.SQLException;


public class JDBCConn {

/**
* @param args
*/
public static void main(String[] args) {
String userName = "nataraj";
String password = "nataraj";
System.out.println("User Name: "+userName);
System.out.println("Password: "+password);
Connection connection;
PreparedStatement prest;
try {
Class.forName("oracle.jdbc.driver.OracleDriver");
connection = DriverManager.getConnection("jdbc:oracle:thin:@localhost:1521:xe",userName ,password );
System.out.println("Successfully connected to Database");
String sql = "select * from emp";
 prest = connection.prepareStatement(sql);
 ResultSet rs1 = prest.executeQuery();
  while (rs1.next()){
 String name = rs1.getString(1);
 int number = rs1.getInt(2);
 System.out.println(name + "\t- " + number);
 }
} catch (ClassNotFoundException e) {
System.out.println("Unable to connect to Database");
e.printStackTrace();
} catch (SQLException e) {
System.out.println("Unable to connect to Database");
e.printStackTrace();
}catch (Exception e) {
System.out.println("Unable to connect to Database");
e.printStackTrace();
}

}

}
JUNIT4 Test case annotations.


@Before ‘ :
In JUnit4 @Before is used to execute set of preconditions before executing a test. 

@After “ :
Method that is marked with @After gets executed after execution of every test. 

@BeforeClass” :
If a JUnit test case class contains lot of tests which all together need a method which sets up a precondition and that needs to be executed before executing the Test Case class then we can utilize “@BeforeClass” annotation.

@AfterClass” :
In the same way “@AfterClass” annotation can be used to execute a method that needs to be executed after executing all the tests in a JUnit Test Case class.

@Test” :
Write you function call in the test method.
Create a simple Web service and  Web service client from a JAVA class using Axis2 web service tool in eclipse.

Introduction


This tutorial is meant to demonstrate the use of the newly introduced Axis2 Web Services tools in the Web Tools Platform Project using the WTP 2.0 drivers. Also this shows how to create a simple Web service and Web service client from a JAVA class. The JAVA class in this scenario converts between the Celsius and Farenheit temperature scales and its the same class that used in the Axis web services tutorials.


Set Up
Before creating the Web service, there are two prerequisites:
  1. Download Eclipse WTP 2.0 and unzip it.
  2. Configure Apache Tomcat inside Eclipse WT 

Creating a bottom up JAVA bean Web service and Web service client using Axis2 WTP Tools

This tutorial need a Axis2 runtime. You can download the latest axis2 binary distribution from here.
Note : Currently Axis2 version 1.2 is the supported version for the Web Services Scenarios
  1. Download the latest Axis2 runtime from the above link and extract it.
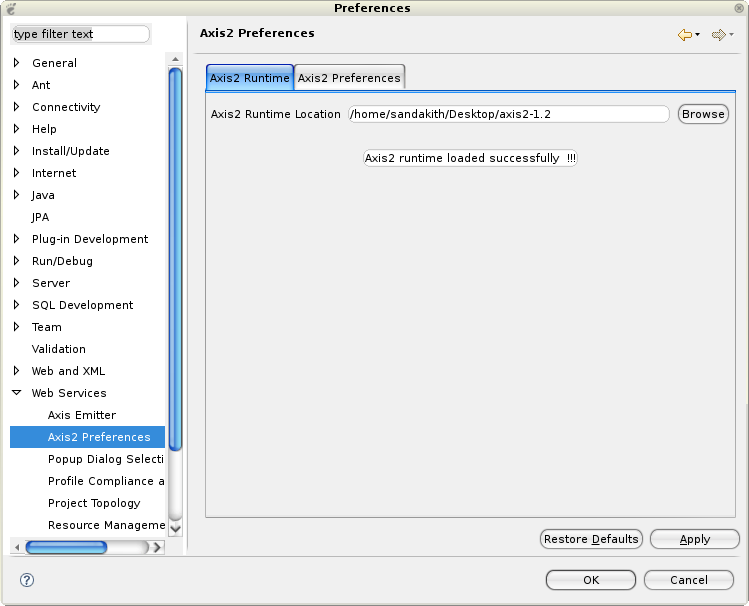
  2. Now we point Eclipse WTP to downloaded Axis2 Runtime. Open Window -> Preferences -> Web Services -> Axis2 Emitter 

  1. Select the Axis2 Runtime tab and point to the correct Axis2 runtime location. Alternatively at the
    Axis2 Preference tab, you can set the default setting that will come up on the Web Services Creation
    wizards. For the moment we will accept the default settings.
  2. Click OK.

  3. Next we need to create a project with the support of Axis2 features. Open File -> New ->
  4.  Other... -> Web -> Dynamic Web Project

    Click next
  5. Select the name Axis2WSTest as the Dynamic Web project name 
  6. (you can specify any name you prefer), and select the configured Tomcat runtime as the target runtime. 

  7. Click next.
  8. Select the Axis2 Web service facet

    Click Finish.
  9. This will create a dynamic Web project in the workbench


  10. Import the wtp/Converter.java class into Axis2WSTest/src (be sure to preserve the package).

    Build the Project, if its not auto build.
  11. Select Converter.java, open File -> New -> Other... -> Web Services -> Web Service

    Click next.
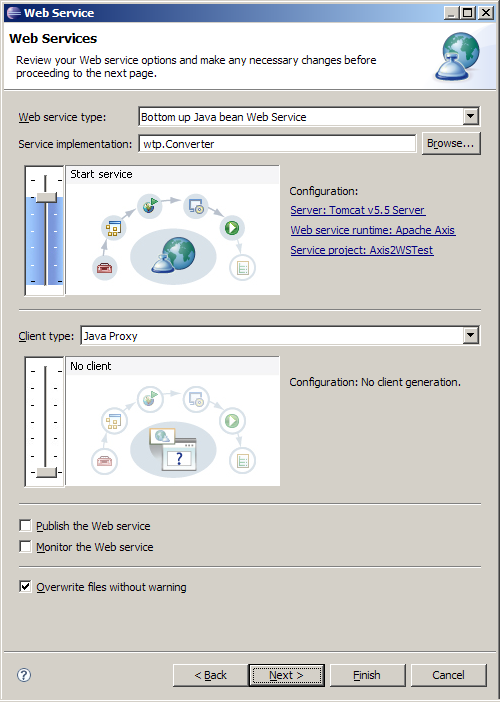
    The Web service wizard would be brought up with Web service type set to
    Bottom up Java bean Web Service with the service implementation automatically filled in.
     Move the service scale to Start service

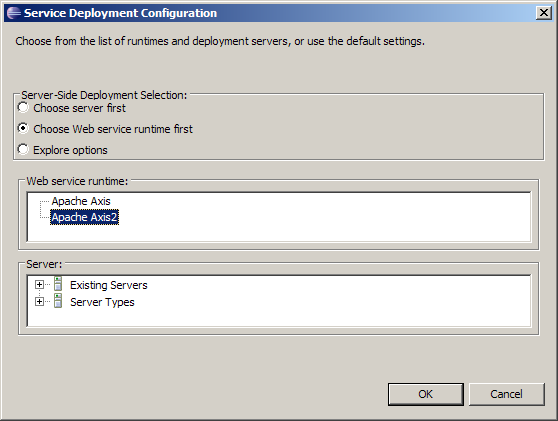
  12. Click on the Web Service runtime link to select the Axis2 runtime.

    Click OK.
  13. Ensure that the correct server and service project are selected as displayed below.

    Click next.
    This page is the service.xml selection page. if you have a custom services.xml, you can include that
     by clicking the Browse button. For the moment, just leave it at the default. 

  14. Click next.
    This page is the Start Server page. It will be displayed if the server has not been started.
    Click on the Start Server button. This will start the server runtime. 

  15. Click next.
  16. This page is the Web services publication page, accept the defaults.

    Click Finish.
    Now, select the Axis2WSTest dynamic Web project, right-click and select Run -> Run As
    -> Run on Server to bring up the Axis2 servlet. 

  17. Click Next.
    Make sure you have the Axis2WSTest dynamic Web project on the right-hand side under the
    Configured project. 

  18. Click Finish.
    This will deploy the Axis2 server webapp on the configured servlet container and will display the
    Axis2 home page. Note that the servlet container will start up according to the Server configuration
     files on your workspace. 

  19. Click on the Services link to view the available services.
  20.  The newly created converter Web service will be shown there. 

  21. Click on the Converter Service link to display the ?wsdl URL of the newly created Web service.Copy the URL. 

  22. Now we'll generate the client for the newly created service by referring the ?wsdl generated by the 
  23. Axis2 Server. Open File -> New -> Other... -> Web Services -> Web ServiceClient 


  24. Paste the URL that was copied earlier into the service definition field.

  25. Click on the Client project hyperlink and enter Axis2WSTestClient as the name of the client
  26.  project. Click OK.


  27. Back on the Web Services Client wizard, make sure the Web service runtime is set to Axis2 and
  28.  the server is set correctly. Click Next.


  29. Next page is the Client Configuration Page. Accept the defaults and click Finish.


  30. The Clients stubs will be generated to your Dynamic Web project Axis2WSTestClient.


  31. Now we are going to write Java main program to invoke the client stub.
  32.  Import the ConverterClient.java file to the workspace into the wtp package in the src folder of 
  33. Axis2WSTestClient.


  34. Then select the ConverterClient file, right-click and select Run As -> Java Application.
  35.  Here's what you get on the server console:


  36. Another way to test and invoke the service is to select Generate test case to test the service 
  37. check box on the Axis2 Client Web Service Configuration Page when going through the 
  38. Web Service Client wizard.


  39. If that option is selected, the Axis2 emitter will generate JUnit testcases matching the WSDL we
  40.  provide to the client. These JUnit testcases will be generated to a newly added source directory to 
  41. the Axis2WSTestClient project called test.


  42. Next thing we need to do is to insert the testcase with the valid inputs as the Web servivce method 
  43. arguments. In this case, let's test the ConverterConverterSOAP11Port_httpTest.java by provide
  44.  values for Celsius and Farenheit for the temperature conversion. As an example, replace the 
  45. generated TODO statement in each test method to fill in the data with values as:
     
    testfarenheitToCelsius() -> farenheitToCelsius8.setFarenheit(212);
    
    testStartfarenheitToCelsius() -> farenheitToCelsius8.setFarenheit(212);
    
    testcelsiusToFarenheit() -> celsiusToFarenheit10.setCelsius(100);
    
    testStartcelsiusToFarenheit() -> celsiusToFarenheit10.setCelsius(100);
        
    Here the testcases were generated to test both the synchronous and asynchronous clients.
  46. After that, select the testcase, right-click, select Run As -> JUnit Test. You will be able to run the
  47.  unit test successfully invoking the Web service.

Wednesday, August 22, 2012

How to read the value from property file in Powershell script ?


Create a file "scriptname.config" and copy the below xml content and save.

<?xml version="1.0"?>
<configuration>
  <appSettings>
    <add key="folderName" value="powershellFolder" />
    <add key="versionNumber" value="v001" />
  </appSettings >
</configuration>

Open powershell prompt , navigate to the config file folder and execute the below script.

$path = ".\scriptname.config"
$global:properties = @{}
$config = [xml] ( gc $path )
foreach ($addNode in $config.configuration.appSettings.add) {
      $global: properties[$addNode.Key] = $addNode.Value
}

get the values from the key value list "properties" as shown below.

$ properties[" folderName "]
$ properties[" versionNumber "]

How to get SFTP connection using java code ?

Download "jsch-0.1.48.jar" and add this jar file to the project library.


import com.jcraft.jsch.Channel;
import com.jcraft.jsch.ChannelSftp;
import com.jcraft.jsch.JSch;
import com.jcraft.jsch.JSchException;
import com.jcraft.jsch.Session;

public class SFTPConnectionTest {
public static void main(String[] args) {
JSch jsch = null;
Session session = null;
Channel channel = null;
ChannelSftp c = null;
String host = "HostName/IP";
String port = "22";
String username = "USER_NAME";
String pass = "PASSWORD";
String khfile = null;
try {
jsch = new JSch();
session = jsch.getSession(username, host, Integer.parseInt(port));
if(khfile != null)
jsch.setKnownHosts(khfile);
else
session.setConfig("StrictHostKeyChecking", "no");
session.setPassword(pass);
session.connect();
channel = session.openChannel("sftp");
channel.connect();
c = (ChannelSftp) channel;
System.out.println("Connected sucessfully.... !!!");
                        c.put("SourceFilePATH", "DestinationFilePATH");


} catch (JSchException e) {
System.out.println("Exception occured while getting SFTP connection  :"+ e.getMessage());
} finally {
c.disconnect();
session.disconnect();
}

}

}

Powershell Scripting 


we should follow some steps In order to connect to remote machine and execute batch file or copy file from the client machine through powershell script.

Remote machine:

Steps need to be followed in the remote machine in order to connect from remote through Powershell.

Open the command prompt and type “powershell” and enter. It will open the powershell prompt.

 To allow other machine to access remotely from poweshell scripting , We should create some listeners in the remote machine, so in order to create listener ,execute below command and it will ask user for the input, enter “y”.

1.       winrm quickconfig

We also need to increase the memory of  “Memory per shell”, so  execute the  below command
(From command prompt…not from PowerShell prompt)

1.       winrm set winrm/config/winrs @{MaxMemoryPerShellMB="1000"}
  

Client Machine :

From the client machine execute the below command to execute batch file of remote machine.

$SecPass = convertto-securestring -asplaintext -string "Password" -force
 $Creds = new-object System.Management.Automation.PSCredential -argumentlist " domain\user ",$SecPass
Invoke-Command -ComputerName ComputerName -cred $Creds { C:\foldername\test..bat}


Copy file from client to remote machine using powershell:


Execute the below command with the proper user credentials and source and destination path of the files need to copied.

Note: The folder in the remote machine should be shared before copying or pasting file.

Import-Module bitstransfer
$SecPass = convertto-securestring -asplaintext -string "password" -force
$cred = new-object System.Management.Automation.PSCredential -argumentlist "domain\user",$SecPass
$sourcePath ="C:\folder\testXML.xml"
$destPath ="\\remoteComputerIP\Test_Copy_File_From_Remote"
Start-BitsTransfer -Source $sourcePath -Destination $destPath -Credential $cred -DisplayName "TransferSOAPScript"


Copy file from remote to client machine using powershell:


Execute the below command with the proper user credentials and source and destination path of the files need to copied.

Note: The folder in the remote machine should be shared before copying or pasting file.

Import-Module bitstransfer
$SecPass = convertto-securestring -asplaintext -string "password" -force
$cred = new-object System.Management.Automation.PSCredential -argumentlist "domain\user",$SecPass
$sourcePath ="\\remoteComputerIP\Test_Copy_File_From_Remote\sample.txt"
$destPath ="C:\folder"
Start-BitsTransfer -Source $sourcePath -Destination $destPath -Credential $cred -DisplayName "TransferSOAPScript"